SwiftUI 에서 Alert 창을 띄우기 위해서는 View의 Modifier인 .alert 메서드를 사용하면 된다.
alert(_:isPresented:presenting:actions:message:) | Apple Developer Documentation
Presents an alert with a message using the given data to produce the alert’s content and a string variable as a title.
developer.apple.com
그런데 SwiftUI는 IOS 14.0을 지원하고, 새로 지원하는 alert modifier는 IOS 15.0 부터 가능하다.
(13.0도 SwiftUI를 지원했던 것으로 기억하는데, SwiftUI프로젝트를 생성하면 생성되는 시작점 구조체에 App프로토콜이 14.0부터 지원을 하게되어 13.0에서 SwiftUI를 사용하려면 UIKit 프로젝트를 생성하고 UIHostingController를 사용해 연결해줘야 한다. https://jerry-bakery.tistory.com/m/entry/iOS-SwiftUI-최소버전-iOS-13으로-설정)
유용하게 쓰는 어플들이나 SwiftUI를 도입했다는 어플들을 보면 최소지원 OS가 14.0이기 때문에 SwiftUI를 공부하면서 14.0, 15.0 둘 다 사용할 수 있는 방법 위주로 정리를 하였다.
Alert
[IOS 14.0] Alert 생성 방법
Button(action: {
    self.isShowAlert = true
}) {
    Text("Show Alert")
}
.alert(isPresented: $isShowAlert) {
    Alert(title: Text("Title"),
          message: Text("message"),
          primaryButton: .cancel(Text("NN")),
          secondaryButton: .default(Text("YY")))
}
alert 내부 action으로 Alert()를 생성해줘야지 Alert 생성이 가능하다. .alert(isPresented:, content:)
primaryButton, secondaryButton 만 생성이 가능하다.
Alert의 Apple공식 문서를 보면 Deprecated 되어 있지만 14.0을 지원하려면 이 방법을 쓰거나, UIKit, ViewRepresenter를 사용해서 Alert을 따로 구현해서 사용해야 한다.
[IOS 15.0] Alert 생성 방법
 Button("Alert 띄우기") {
     isShowAlert = true
 }
 .alert("메시지", isPresented: $isShowAlert) {
     // role을 none으로 설정하면 다른 버튼과 크기가 비슷하지만, role이 아예없는 버튼을 넣으면 크기가 다르다.
     //Button("okay2", action: {})
     Button("okay", role: .none, action: {})
     Button("delete", role: .destructive, action: {})
     Button("cancel", role: .cancel, action: {})
 }
IOS 15.0 부터는 modifier만으로 생성이 가능하다. actions 파라미터에서 View를 반환하는 클로저를 생성해 버튼을 생성할 수 있다.
Button에는 role을 설정 할 수 있는데 UIKit에서 Alert 버튼을 세팅할 때 사용했던 .cancel, .destructive, .none이 존재한다. 그 외에도 기본 버튼도 넣을 수 있는데, role이 있는 버튼과 아예 없는 버튼은 크기차이가 조금 있다.
아래 이미지에서 okay2가 role 없이 생성한 버튼이고, okay는 role을 .none으로 설정한 버튼이다.
ActionSheet
ActionSheet의 15.0 버전 이전의 생성은 Alert와 큰 차이가 없다.
[IOS 14.0] ActionSheet 생성 방법
Button("Button", action: {
    self.isShowActionSheet = true
})
.actionSheet(isPresented: $isShowActionSheet) {
    ActionSheet(title: Text("Sheet"),
                message: Text("Action Sheet Message"),
                buttons: [
                    .cancel(Text("cancel"), action: {}),
                    .default(Text("default"), action: {}),
                    .destructive(Text("destructive"), action: {})
                ])
}
alert 생성과 비슷하게 actionsheet modifier를 사용하고, 내부에 ActionSheet을 생성하는 방식이다.
아직 16.0에서도 사용 가능하지만, 훗날 Deprecated 될 것이라고 경고하고 있다. 공식 문서에서는 Deprecated 된 것으로 나온다.
[IOS 15.0] ActionSheet 생성 방법
IOS 15.0 에서는 ActionSheet이 Deprecated되면서 confirmationDialog로 명칭이 변경되었다.
confirmationDialog(_:isPresented:titleVisibility:presenting:actions:message:) | Apple Developer Documentation
Presents a confirmation dialog with a message using data to produce the dialog’s content and a localized string key for the title.
developer.apple.com
Button("Button", action: {
self.isShowActionSheet = true
})
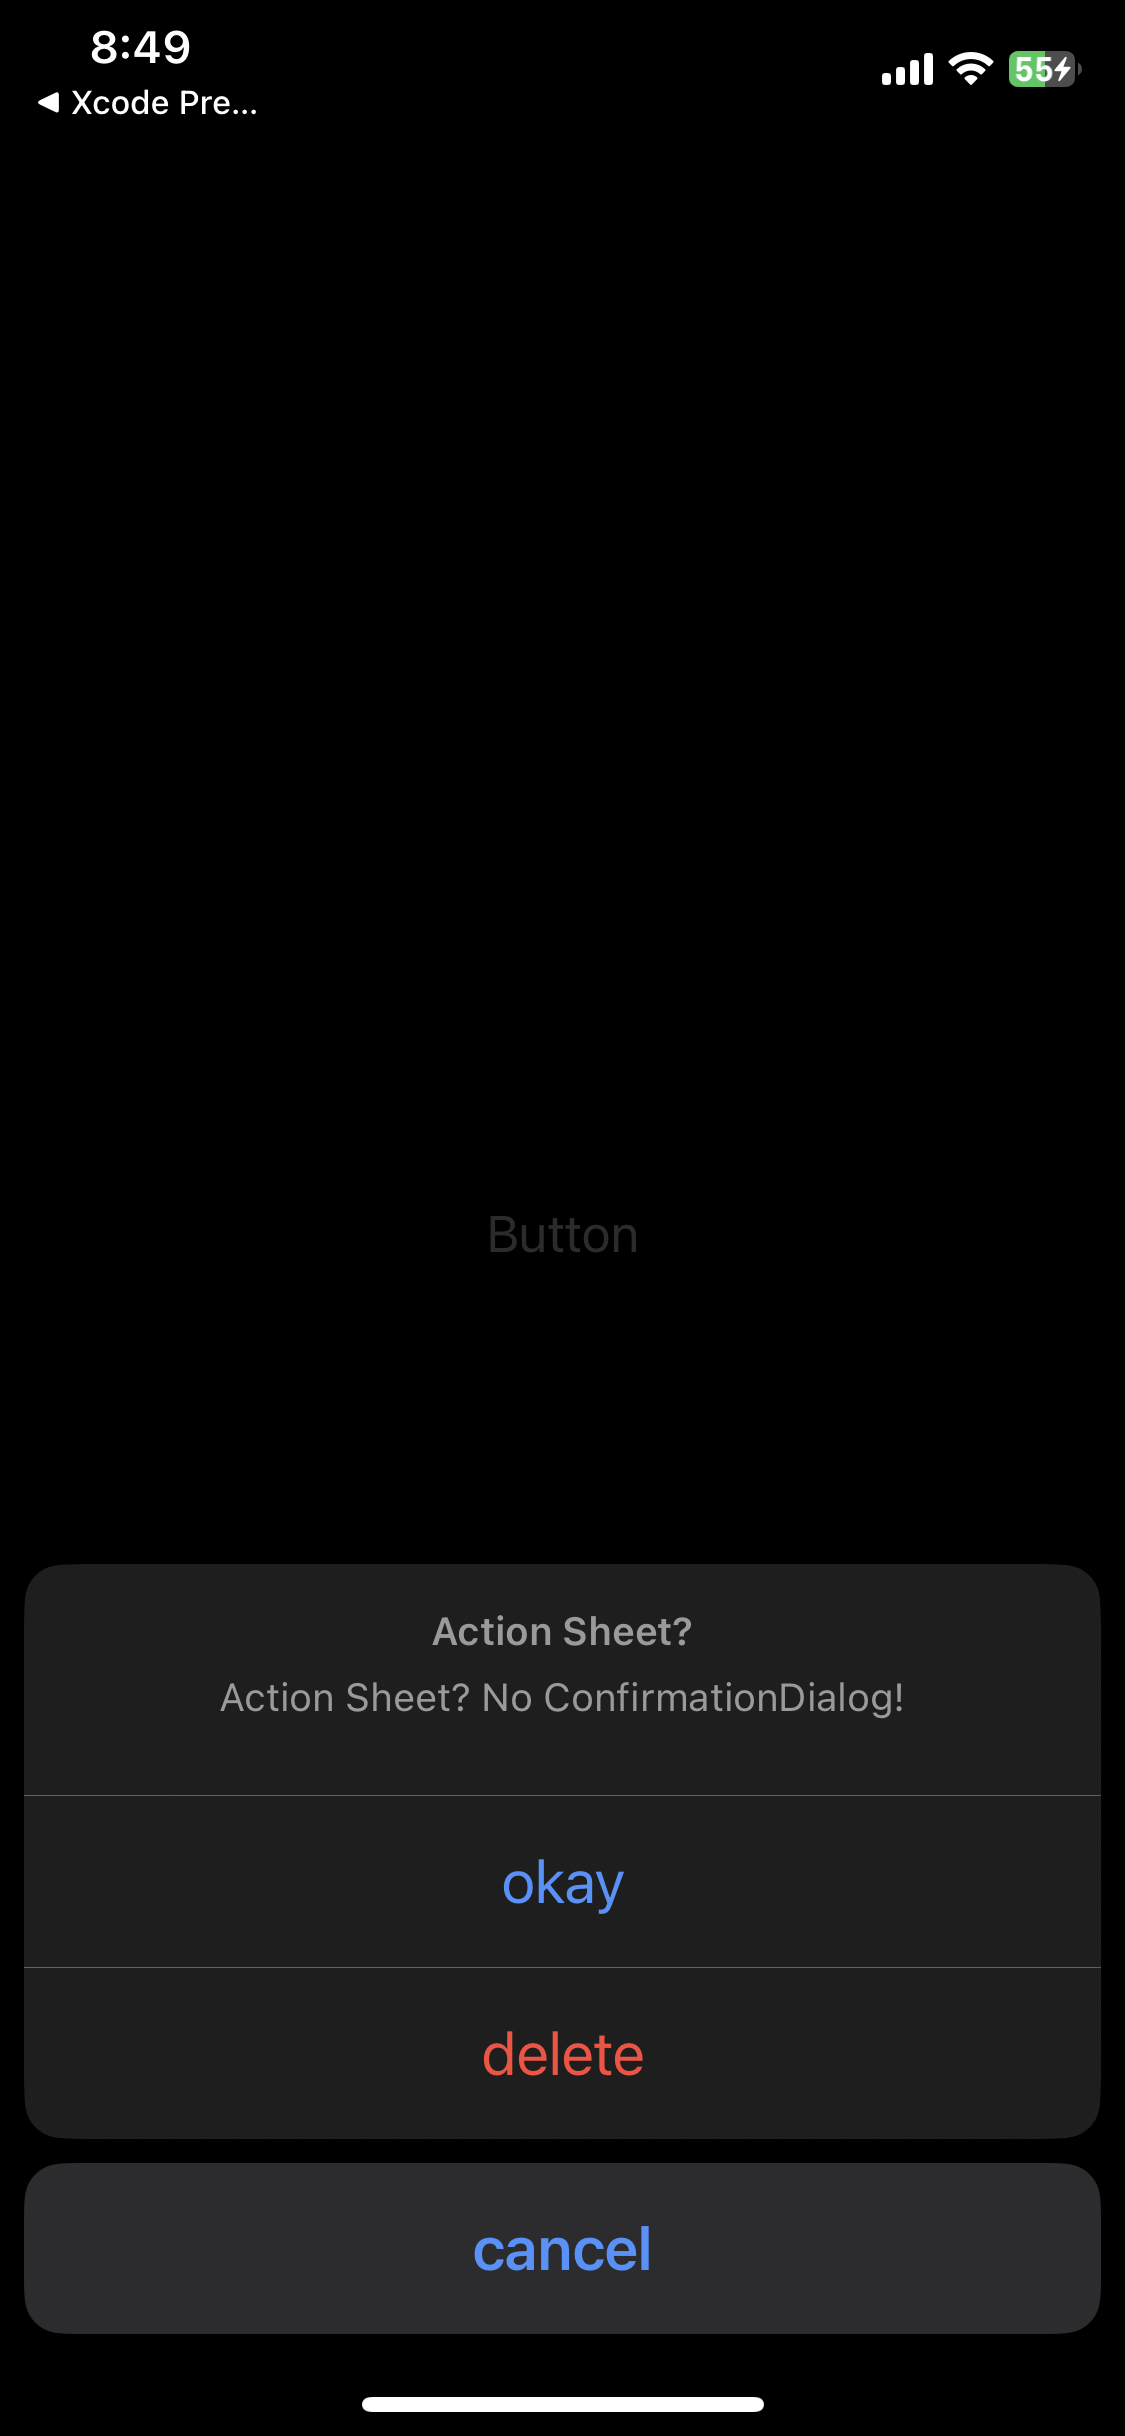
.confirmationDialog("Action Sheet?",
isPresented: $isShowActionSheet,
titleVisibility: .visible) {
Button("okay", role: .none, action: {})
Button("delete", role: .destructive, action: {})
Button("cancel", role: .cancel, action: {})
} message: {
Text("Action Sheet? No ConfirmationDialog!")
}titleVisibility 프로퍼티로 Title의 표시 유무를 선택할 수 있다. automatic, visible, hidden 옵션이 존재하며, 기본값으로 automatic이 잡혀있다.
그 외의 부분은 Alert 생성과 비슷한 모습을 보이고 있다.
또 하나 공식문서의 예제를 보면 메서드에 presenting이라는 제네릭 옵셔널 타입의 파라미터가 존재한다.
confirmDialog가 컨트롤 하기위한 데이터를 넣을 수 있는 것이고, actions 클로저의 파라미터로 받아 사용 할 수 있다.